
I’m sure this is something everyone has (or will) have to tackle at some point in their Windows IT career – creating a customized version of Windows for the office, for the enterprise, or for a specific one-off scenario. I’ve gone through the steps many times, and each time I seem to do things a little bit differently.
Recently, I wanted to create my own customized version of Windows 8.1 Enterprise. This isn’t for work, it’s for me. I’m constantly having to reimage my PC(s) for personal projects, and I got tired of re-downloading all the updates and re-installing all my apps. This is something I had been putting off for a while, but now that it’s completed, I wanted to document the steps I took, and more importantly, what worked.
This isn’t the only way to do things, it’s just what I did. I’m going to try avoiding third-party solutions and instead focus on using Microsoft offerings (e.g. ADK and MDT). Additionally, since UEFI is the future, after following these steps you will have a UEFI capable ISO and the ability to produce a UEFI bootable flash drive (or in my case, two flash drives).
Acquiring the necessary Tools
- Download the Windows ISO for which you are creating custom media. In my case, I’m downloading “en_windows_8.1_enterprise_with_update_x64_dvd_4065178.iso” from MSDN.
- Download the Microsoft Deployment Toolkit 2013 from here.
- Download the Windows Assessment and Deployment Kit (ADK) for Windows 8.1 Update from here.
Preparing your environment
- Designate a workstation (physical machine) with Hyper-V capability as the “host” for this project. I’m going to assume your host is running Windows 8.1 Update.
- Open the Windows ADK for Windows 8.1 Update installer.
- Select and install
Deployment ToolsandWindows Preinstallation Environment (Windows PE).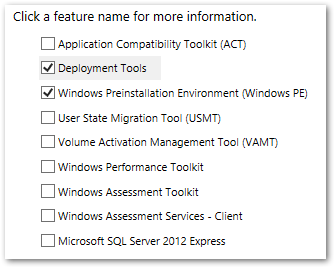
- Select and install
- Install the Microsoft Deployment Toolkit 2013.
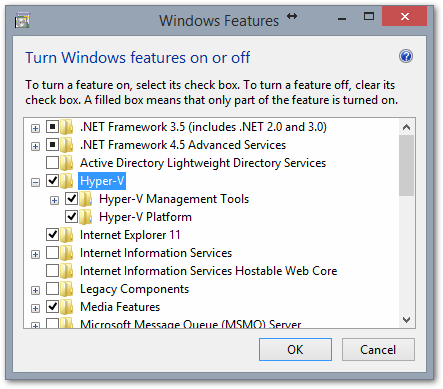
- Enable the Hyper-V Platform and reboot the host.
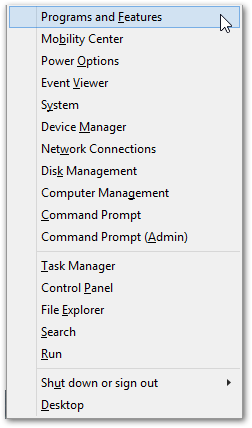
To do this, at your desktop type Win+X and click Programs and Features at the top.
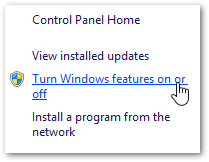
Select Turn Windows features on or off.
Select Hyper-V and click OK. When prompted, click Restart now.
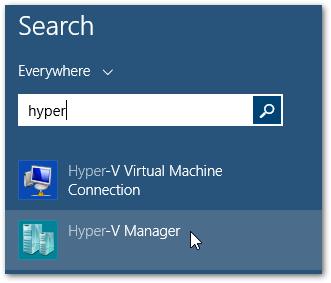
- Once rebooted, open the Start Screen and type “Hyper” > Open Hyper-V Manager.
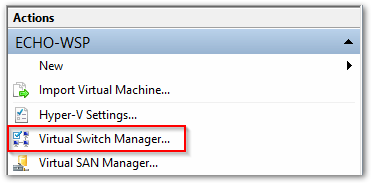
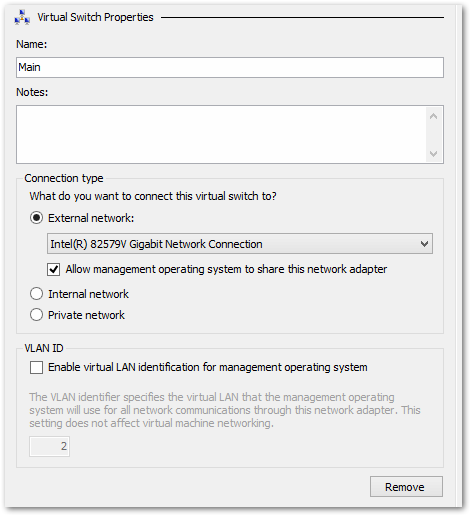
- Select your host (computer name) on the left and then click Virtual Switch Manager.. (on the right)
- Select New virtual network switch on the left and External under the type to create. Click Create Virtual Switch.
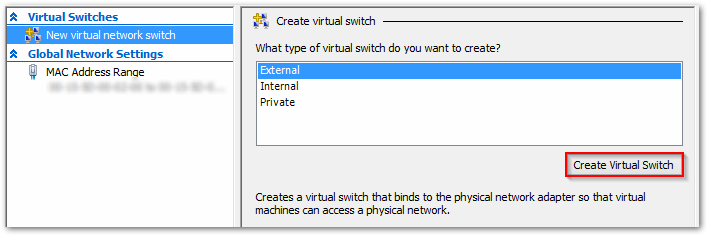
- Name the switch something appropriate (I’m using “Main”).
- Select External Network > Select your main NIC (wireless or wired).
- Check Allow management operating system to share this network adapter and click OK.
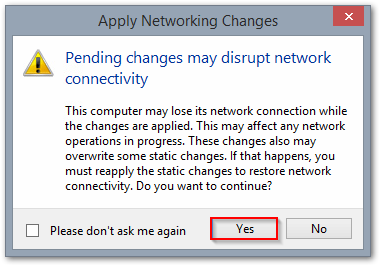
- Click Yes on the notice prompt.
Create the Staging VM
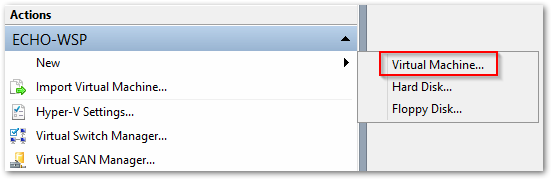
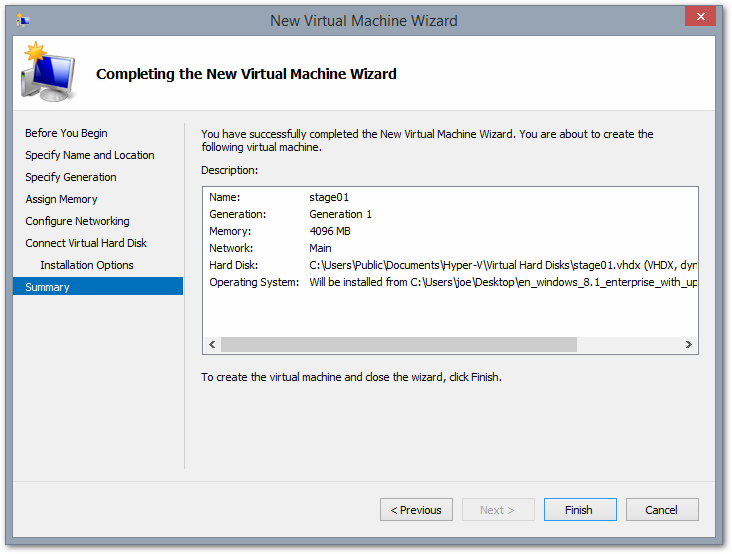
- Now that you’re prepped, within Hyper-V Manager select New > Virtual Machine and then click Next.
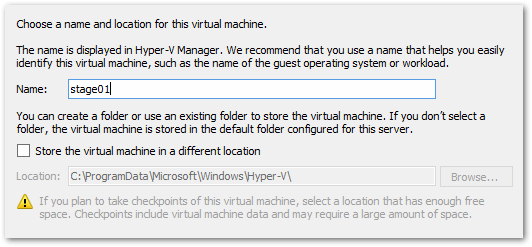
- Type a name for your staging VM (I’m picking stage01) then click Next.
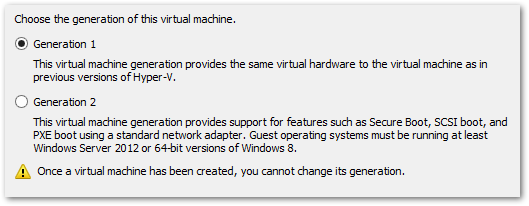
- Select Generation 1 and then click Next.
- Enter an appropriate amount of memory (I’m entering 4096 MB), UNselect Dynamic Memory and then click Next.

- Choose the Network Connection you previously created and then click Next.

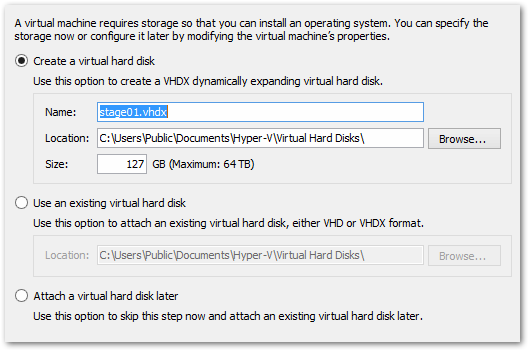
- Designate an adequate amount of storage for your VM (not less than the total GB of all applications you will be installing) and then click Next.
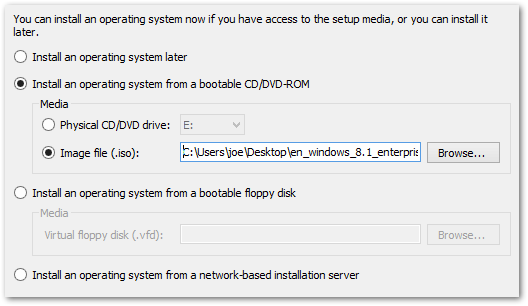
- Select Install an operating system from a bootable CD/DVD-ROM > Select Image File (.iso) > Find and select the Windows ISO you downloaded earlier > Click Next > Click Finish.
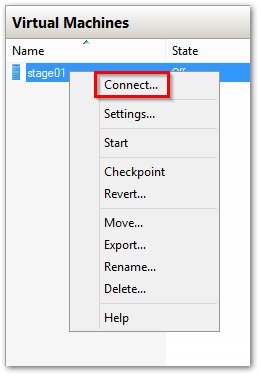
- Back at the Hyper-V Manager, right click stage01 and select Connect… (This will open the console of the VM.)
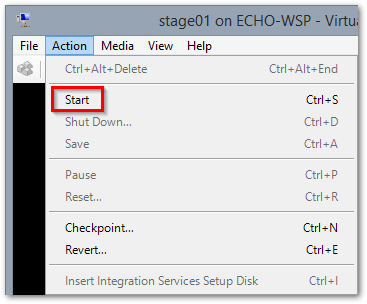
- Navigate to Action and click Start.
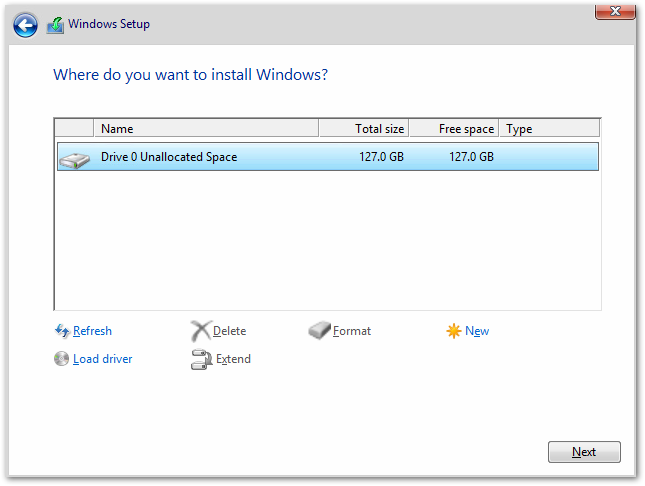
- Install Windows 8.1 by accepting the EULA and choosing Custom > selecting the entire virtual disk and clicking Next.
Enter Audit Mode and Install Applications
- Once you’re presented with the Personalize screen (where you select the color template and PC name) – STOP.
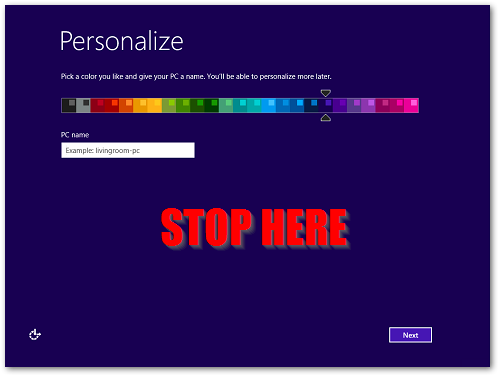
- Enter
CTRL+SHIFT+F3. - Windows will reboot and log you in with the Administrator account.
- When presented with the System Preparation Tool window, click Cancel.
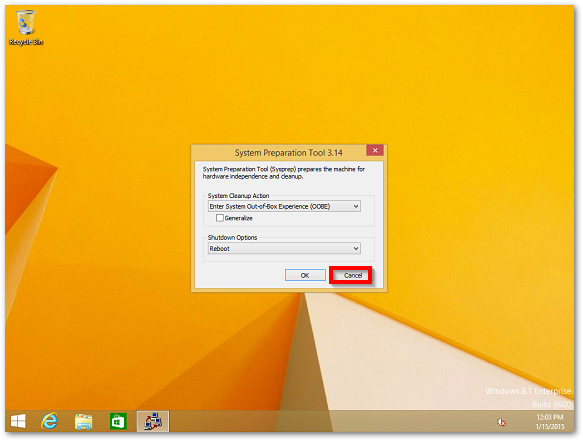
If you’re not familiar with Audit Mode, this is a mode designed specifically for what we’re doing, creating a custom Windows build. Unfortunately, I don’t see people using it much these days and I personally think that is a mistake. Utilizing Audit Mode allows the admin to bypass OOBE, avoid having to create a user account (thus assigning a “Registered Owner” name) and it’s also simply the recommended best practice. TL;DR: Use it.
- At this point, make any tweaks and install all applications that you want embedded into your custom Windows build.
Examples:

* Turn UAC off

* Enable RDP

* Install Chrome, VLC, Skype, Office, etc.
Running Windows Update
If you tried jumping ahead and running Windows Update, you’ll notice that for some crazy reason .. it doesn’t work! Without explanation, WU simply hangs in an endless loop without installing a thing. WU in Audit Mode worked perfectly in Windows 7, but not so in Windows 8.1. I don’t know if Microsoft just wasn’t thinking or they simply forgot that most people like to fully update their custom Windows builds before deployment. Whatever the reason is, all I know is that Windows Update simply does not function in Audit Mode.
Upon further research I found an email from Microsoft Engineers that said this is “by design.” Apparently WU (in 8.1) uses the OOBEComplete() Windows API call. Essentially, WU sees that OOBE has not completed, and refuses to run. This was designed so that OEM’s do not have Windows automatically installing updates they don’t want installed, and instead allow the OEM to install each indivual update they want, manually. I’m sorry, but this is ridiculous. Expecting Sys Admins/Engineers to manually inject a bunch of updates using DISM when the process can be expedited by just running Windows Update is just silly. Give us a way to re-enable this feature, Microsoft.
But we HAVE to update our build! That was one of the primary reasons we’re going through this hassle, right? Not to worry. PowerShell to the rescue!
Some really cool dude built a custom PowerShell module (brilliantly named Windows Update PowerShell Module) which can be downloaded from TechNet.
- Download this ZIP within your Staging VM and extract it.
- Copy the
PSWindowsUpdatefolder to%WINDIR%\System32\WindowsPowerShell\v1.0\Modules.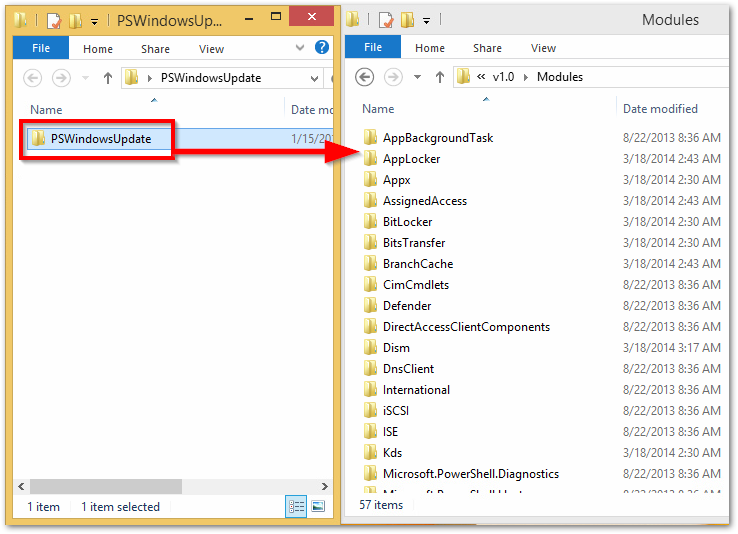
- Open PowerShell as Administrator
Start > "power" > Right-Click "Windows PowerShell" > Run as administrator. - Type
Set-ExecutionPolicy RemoteSignedand press Enter. - When prompted, type
Yand press Enter. - Type
Import-Module PSWindowsUpdateand press Enter. - Type
Get-WUInstalland press Enter. - You will then be presented with each Windows Update that needs approval to be downloaded and installed. (Pressing Enter a bunch or pressing A to accept all updates.)
- Alternatively, you could enter
Get-WUInstall -AcceptAll -IgnoreRebootand this would install all available updates without prompting you first.
- Alternatively, you could enter
- After completed, reboot, re-import the module and run
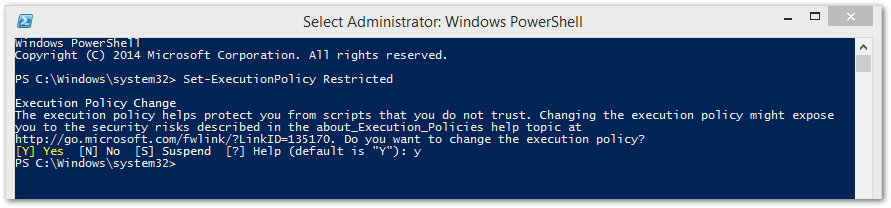
Get-WUInstallagain. Keep doing this until there are no more updates available. - Open Powershell (As Admin) and type
Set-ExecutionPolicy Restricted> Enter > TypeY> Enter.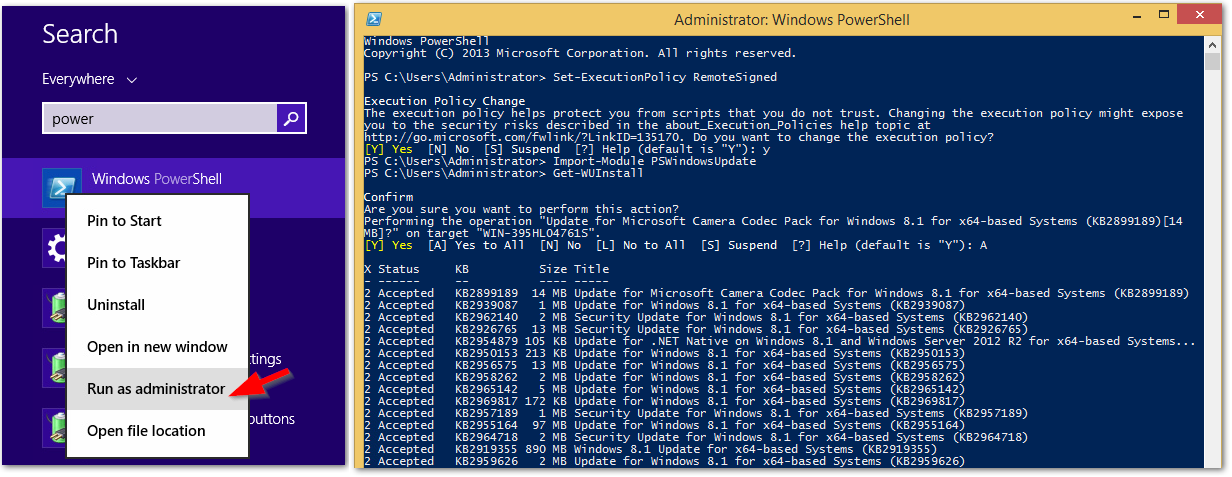
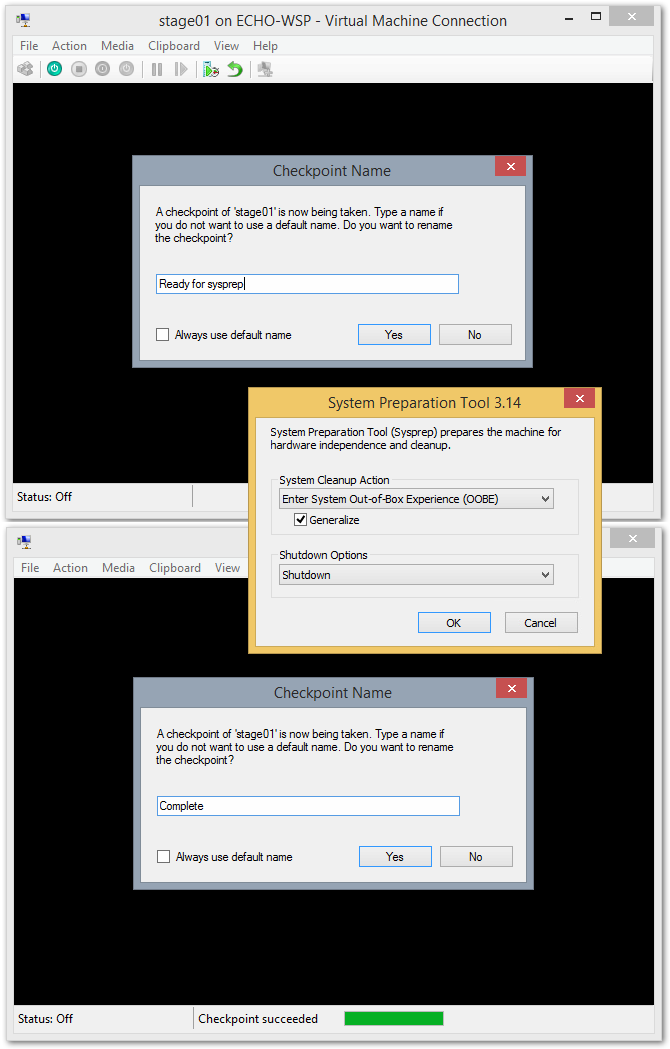
Cleanup and Sysprep
At this stage you have everything customized just the way you like, all your applications are installed and you’re fully updated. Now’s a good time to run Disk Cleanup. Already did that? Then let’s Sysprep.
- Shutdown your Staging VM.
- Create a Checkpoint
Click Action > Checkpoint.. > Enter "Ready for sysprep" > Click Yes - Power your Staging VM back on.
- When logged in, do not close the System Preparation Tool window.
- Select Enable System Out-of-Box Experience (OOBE)
- Checkbox Generalize
- Select Shutdown
- Click OK
Once your VM is shut down, create another Checkpoint named “Complete”.
Do NOT power your VM back on.
You’re done with Part 1! In Part 2 we’ll start by capturing your virtual disk into a WIM file.